Slab on Ground
Key Considerations
- Concrete placement planning
- Concrete strengths
- Control joints
- Damp-proofing
- Cast-in services
- Reinforcement cover
- Deep edge beams
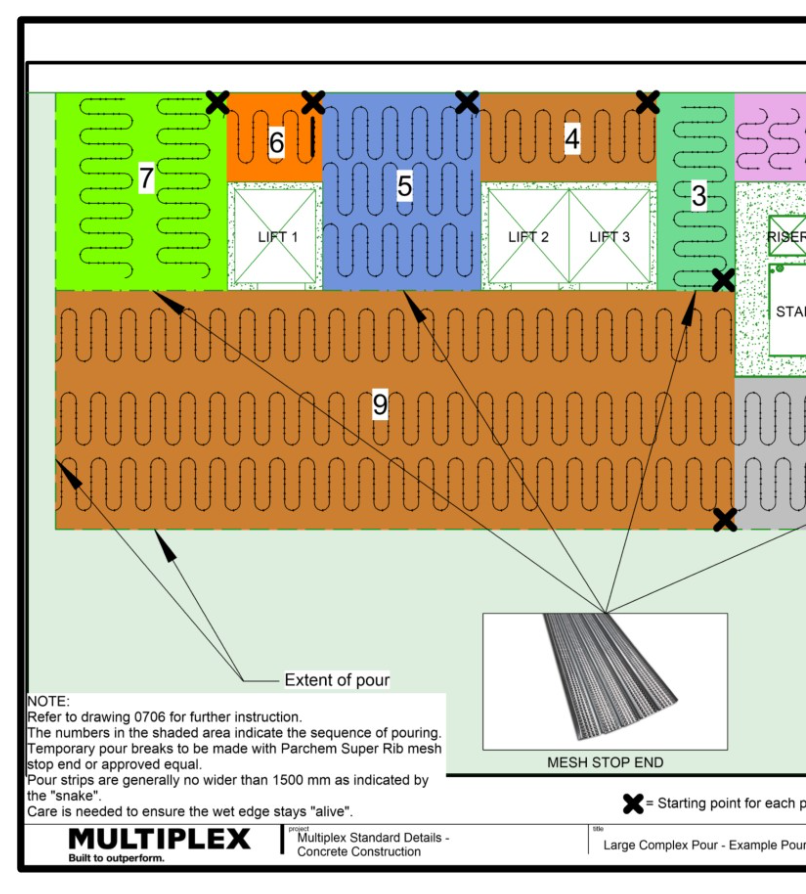
Planning
Placement
A Concrete Trade Risk Workshop must be undertaken to agree on sequence of activities details.
Concrete planning must be undertaken 2 days prior to every pour, and consider:
- Contingency plan for unexpected events such as delivery delays or changes in the weather
- Acceptable cold joint locations for unplanned stoppages and delays
- Number of pumps
- The starting point
- Length of wet edge
- Maximum layer depth / pour rate (formwork design)
- Maximum time between batching and placing
- Finish required (if any)
- Multiple concrete strengths (i.e. mushrooming columns)
- Significant height difference (i.e. large folds)
- Use of aliphatic alcohol
- Deep edge beams
- A pour plan (snake sequence) must be documented and include details as outlined in Figure 1.
Preparation
Sub-grade Preparation (Damp-proofing)
Damp-proofing membrane must:
- Be high impact resistant 0.2mm thick (min.) polyethylene sheet branded “AS2870 concrete underlay.”
- Lap all joints at a minimum of 200mm.
- Have waterproof tape applied to all joints.
- Have all penetrations for pipes sealed with a waterproof tape.
- Be extended at cold joints or pour breaks to allow for mating with the next slab.
- Be extended at exposed edges sufficiently to terminate above F.S.L.
Reinforcement
Reinforcement must:
- Have a minimum cover on top, bottom and side or as specified (no less than 30mm)
- Have sufficient number of bar chairs used
- Have dowel joints fixed in position
- Be placed on plastic bar chairs (use pie plates when metal bar chairs are used).
Cast in Services
Cast in services must:
- Be wrapped (metal and hydraulic pipework)
- Be cast within the slab in the middle third and between the layers of reinforcement
- Be held securely in place with bar chairs, tie wire or similar.
Refer to the Services sections for additional information.
Critical Design Element – Slab on Ground
Concrete Placement
Concrete Mix
- Do not add water at the site.
- Ensure the concrete delivered is the approved design mix for the member cast onsite.
- Ensure manufacturers' specifications and the consultants' specifications are followed for any concrete add mixtures.
Placement
Concrete placement must:
- Follow the pour plan diagram (snake sequence).
- Ensure cold joint locations are as per engineer's details.
Concrete Mix Design
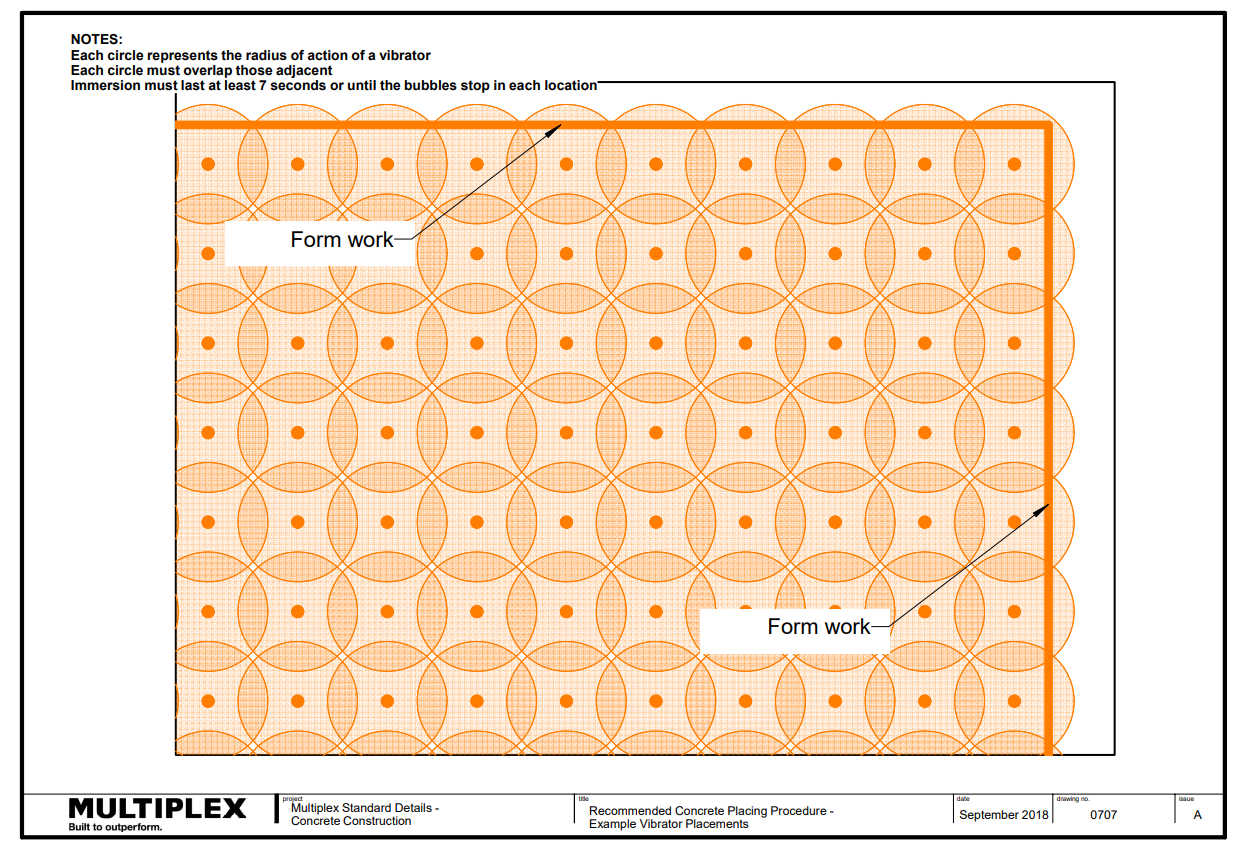
Concrete Compaction
- One 50mm vibrator will compact about 10m3/hr. and has a radius of influence of ~250mm.
- Ensure you overlap the radius of influence so that concrete is thoroughly compacted
- The radius of action vertically is 1.5 x the vibrator insertion.
- If your proposed pour rate is 20-30m3/hr you will require two to three vibrators.
During concrete compaction ensure:
- That the reinforcement, tendons, inserts and fixings are completely surrounded by dense concrete.
- At least one spare vibrator is available during every pour.
- Vibrator is inserted quickly for 7 seconds or until bubbles stop and then withdrawn slowly for each location.
- Vibrator is not used to spread concrete.
- Vibrator does not touch either the reinforcement or the formwork.
Click on the image for an enlarged version
Curing
Curing must:
- Commence immediately after finishing (horizontal and vertical elements).
- Be applied at the correct rate.
Finishes
- Confirm concrete is finished to the approved finish with the particular attention paid to areas requiring slip/skid resistance.
- If slip/skid resistance is nominated, prepare a sample before work commences and independently test the sample to confirm that it meets the slip resistance required.
Crack Control
Control joints must:
- Be square at the maximum ratio of 1:1
- Be located as per drawing
- Have a recommended dimension of:
- For slabs 200mm thick max. 4.2 x 4.6m
- For slabs 150mm thick max. 3.5 x 3.2m
- For slabs 125mm thick max. 2.8 x 2.5m
- Be saw cut immediately after finishing and not more than:
- 6 hours in hot windy conditions or
- 18 hours in cold light wind conditions
- Have a minimum depth of 1/4 the slab thickness (where possible,1/3 depth is recommended).
Concrete Curing
Critical Design Elements - Joints in Concrete during Design Phase
Critical Design Elements - Joints in Concrete
Concrete Testing
What is a slump test?
Before a truck load of concrete is discharged into the concrete pump we need to ensure that concrete is tested to the prescribed workability and strength levels as per the specification.
When trucks arrive to deliver concrete, the concrete will be tested from each truck on site prior to pour.
The test performed before concrete is poured is called a slump test. The test measures the physical ‘slump’ of the concrete mix as it comes out of a conical shaped mould. The measured slump must be within a set range, or tolerance, from the specified slump.
What are the various slumps?
Typically, admixtures are incorporated into concrete design to assist with the plastic concrete consistency for uses such as:
- Dry slump concretes (20 to 50mm) giving very low shrinkages due to reduced water content, but are difficult to work in their plastic state.
- Normal slump concretes (60 to 100mm) giving suitable workability for general purpose applications.
- Medium slump concrete (120mm to 160mm slump) for improved pumpability (130 plus metres high)
- Flowing concrete (180mm plus slump) for ease of placement and good off-form finish.
What is a compression (strength) test?
The compression test shows the best possible strength concrete can reach in ideal conditions. The compression test measures concrete strength in the hardened state. The testing is done in a laboratory off-site. The only work done on site is to make a concrete cylinder for the test. The strength is measured in Megapascals (MPa) and is commonly specified as a characteristic strength of concrete measured at 28 days after mixing. The compression strength is a measure of the concrete’s ability to resist loads which tend to crush it.
Slump Test
- Ensure slump tests are conducted as per specification
- Ensure sample is taken from the early part of the load. Never take the sample from the first concrete out of the mixer. Let out at least 0.2 of a cubic metre before taking a test sample.
- Reject any concrete that exceeds designed slump (+ or – 15mm)

Click on the image for an enlarged version
Slump Test
Spread/Flow Test
- Ensure spread/flow test is conducted for self compacting concrete
Strength Test
- Minimum 1 sample (3 cylinders) per 50m3 for slabs, footings & columns.
- Minimum 1 sample (3 cylinders) per 25m3 for walls.
- Ensure cylinders are stored correctly:
- Protected from wind
- In a moist condition
- Sheltered from sun
- Protected from extremes in temperature
Spread Flow Test