Tiling - Ceramic / Porcelain
Key Considerations
- Joint locations
- Bonded vs unbonded screeds
- Efflorescence control
- Material selection - tiles, grout, adhesive
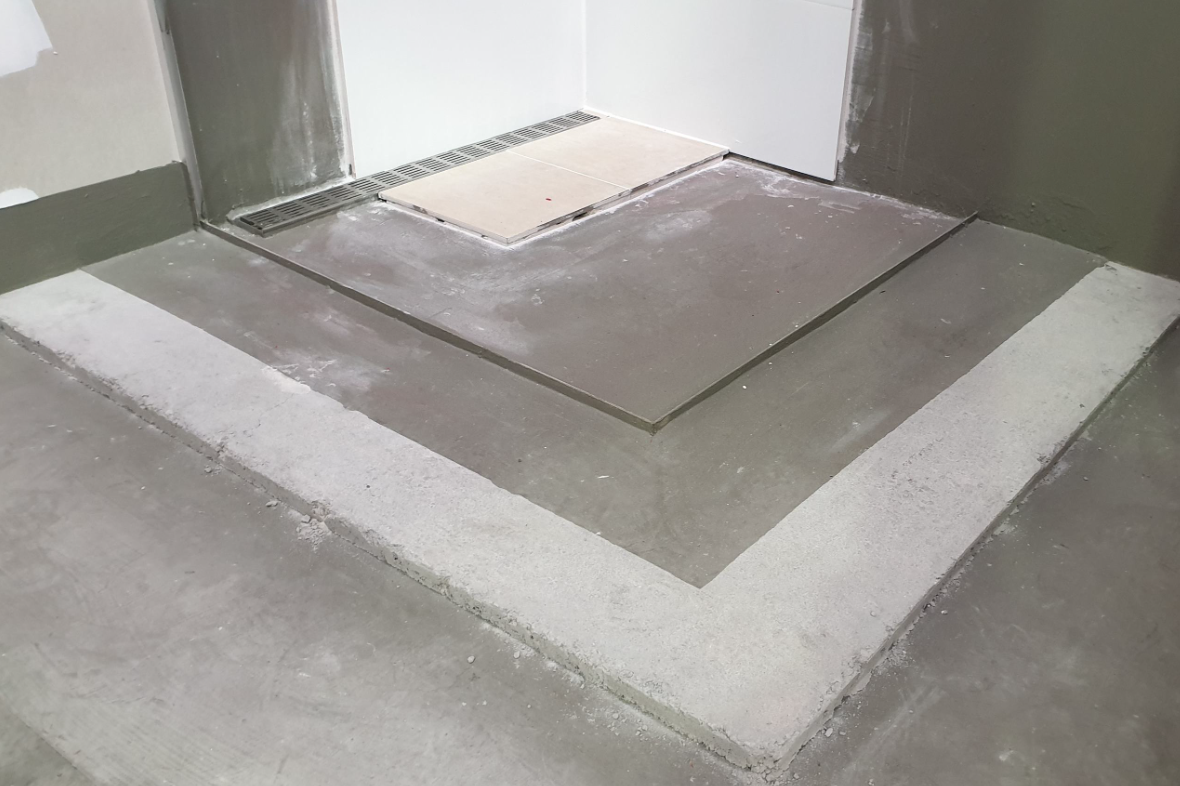
- Protection of drains prior to tiling
- Slip resistance
Design and Planning
The manufacturer or technical representative of the tile adhesive must:
- Attend the Trade Risk Workshop
- Develop a specification for the tiling system which includes adhesive, grout, sealants and secondary membrane (where required).
- Considerations should be given to:
- Specific requirements of each project (the area where the tiles are installed)
- Service conditions when in use
- Type of substrate
- Dimensions of the tiles
- Selection of adhesives
- Any installation constraints (installation schedule, installation technique, etc).
Testing
The slip resistance recommendations for a range of ‘wet floor locations’ is presented within Table 3B of Standards Australia handbook HB198:2014. An example of these locations and the classification recommendations is given below.
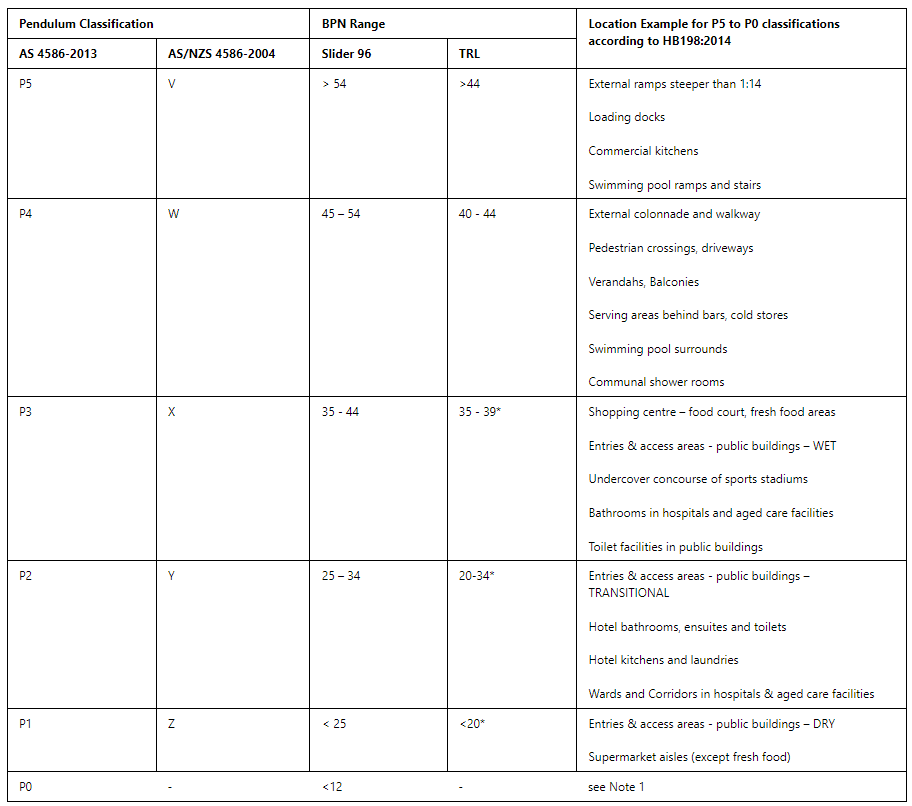
Note 1: note 3 of Notes to Table 3B states:
The minimum classification listed in Table 3B is P1. It is inappropriate for Table 3B to list the lower classification, P0, since there is no lower limit on Classification P0.
Notwithstanding, some smooth and polished floor surfaces, which do not achieve a Classification P1, may be considered to provide a safe walking environment for normal pedestrians walking at a moderate pace, provided the surfaces are kept clean and dry; however, should these surfaces become contaminated by either wet or dry materials, or be used by pedestrians in any other manner, then they may become unsafe. Therefore, the type of maintenance, the in-service inspection of floors, other environmental conditions and use should be taken in to account when selecting such products.
Screeds and Acoustic Underlays
What is screed?
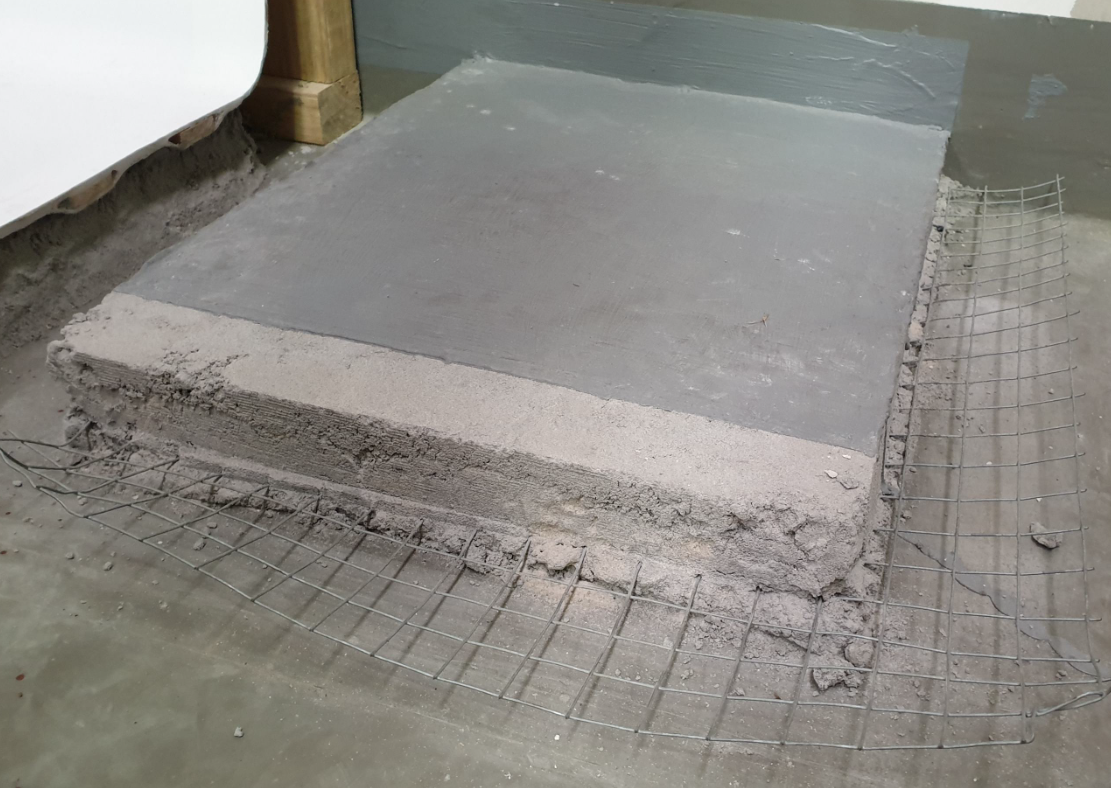
A screed is an intermediate layer between the structural base and the tile adhesive. It is generally made from sand and cement, however can be a premixed product supplied in bags. Its purpose is to provide a true and even surface on which to apply stone or tiles.
There are two main types of screed:
- Bonded screed is a mix that is fully bonded to the concrete substrate with a bonding agent (a slurry coating). This is the ideal type of screed for thinner applications where heavy loading is anticipated.
- Unbonded screed is applied over a clear polythene sheet or other non-coloured, non staining de-bond medium (a solvent borne polyurethane membrane will suffice), laid over the concrete.
Bonded Screeds
Bonded screeds must:
- Be a minimum of 25mm in depth and not greater than 40mm in thickness.
- Be compatible with any waterproof membrane.
- Have a mix ratio between 1:3 and 1:5 cement: sand to result in a minimum strength of 20 MPa compressive strength and 1.5MPa tensile strength.
- Volume-batched using gauge boxes and thoroughly mixed using a forced action mixer.
Unbonded Screeds
Un-bonded screeds must:
- Be designed by a structural engineer where the screed exceeds 60mm in depth.
- Be a minimum of 40mm in thickness.
- Be reinforced with a welded, galvanised wire mesh complying with AS 4671 and AS 3958 that must:
- Have bars spaced in either a square or rectangular pattern at minimum 25mm x 25mm up to 50 x 50 centres.
- Have bars of minimum thickness of 1.2 – 2mm in diameter.
- Have a tensile strength of not less than 380 MPa, and
- Be lapped at joints a minimum of 2.5 bar centres.
- Have a screed mix ratio, 1 part GP Portland cement, 2 parts sand and 4 parts coarse aggregate (clean angular crushed rock 3 to 5 mm) to result in a minimum strength of 20 MPa compressive strength and 1.5MPa tensile strength.
- Volume-batched using gauge boxes and thoroughly mixed.
- Have a debonding layer of any of the following:
- Solvent borne polyurethane (without a broadcast of sand)
- Acoustic matting
- Slip layer, i.e. 200 µm clear polyethylene sheet.
Acoustic Underlay
Acoustic underlay must be:
- Installed under the screed in accordance with relevant requirements of the manufacturer and acoustic consultant.
- 100% rubber when used in wet areas.
- It should be avoided if at all possible.
Control Joints
Floors
Perimeter expansion joints must:
- Be installed in all tile and stone applications
- Have a full depth gap of 10mm through the tile bed
- Be formed by a strip or strips of polyethylene foam, placed against the wall, column, etc. and the tile bed placed up and into contact with the strip
- Be filled with the approved sealant unless approved otherwise.
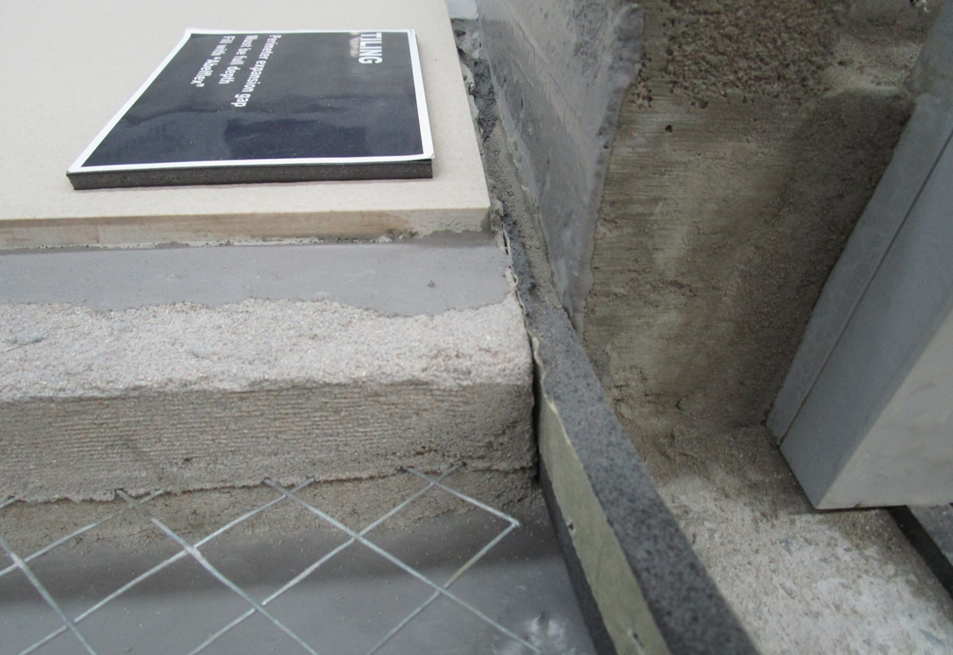
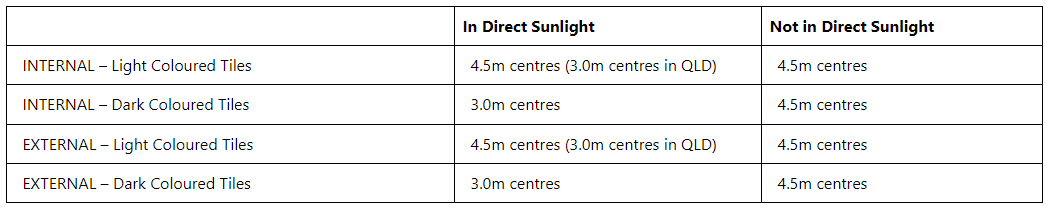
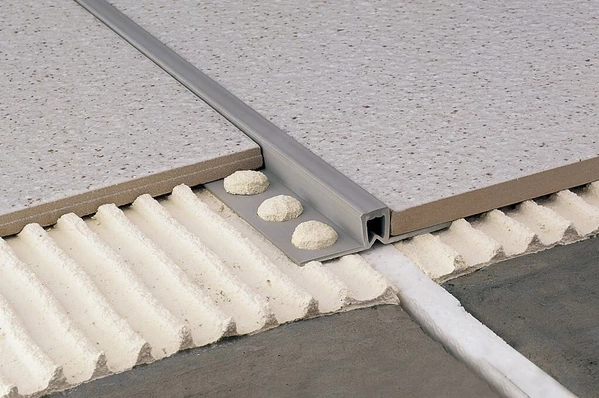
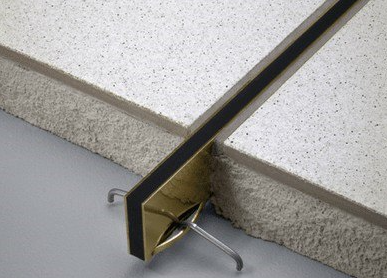
Intermediate expansion joints must:
- Be installed in all tile and stone applications
- Have a full depth gap of 6mm wide (or 10mm if aligned with a substructure joint) through the tile bed
- Be filled with the approved sealant. Note: Sealants are generally suitable for use in wall tiling, around the perimeter of floors and may also be used to fill intermediate movement joints in floors which will only be subjected to light foot traffic and in wet areas.
- Be installed with proprietary pre-formed full depth expansion joint strip (refer Figure 5)
- Be around embedded structural items, eg balustrade posts and hold down bolts
- Be installed around metal floor wastes with an expansion gap of 3 to 6mm wide
- Be at the maximum centres outlined in the table below.
- Be aligned with the joints in the structure (refer Figure 4)
- Have full adhesion coverage (refer Figure 4)
Internal walls
Movement joints should be provided:
- Over existing and/or structural movement joints.
- Where tiling abuts other materials.
- Where tiling is continuous across junctions of different background materials.
- In large tiled areas, at internal vertical corners and at 3m to 4.5m centres horizontally and vertically (where large degrees of thermal movement or vibration are expected, the frequency of movement joints should be increased to accommodate the movement).
- Where stresses are likely to be concentrated, for example at changes of alignment.
Movement joints should be of a suitable width to permit the sealant to accommodate the expected movement (typically 6mm).
Secondary Membranes
What are secondary membranes?
Secondary membranes are required to reduce or eliminate efflorescence issues associated with tiled areas that are subject to wetting. Efflorescence is the unsightly white staining that is a common occurrence on building projects.
Secondary waterproof membranes as a minimum must be used to control efflorescence to tiles in:
- Every shower recess
- Every entire bathroom floor (Preferred)
- Every balcony or other exposed location
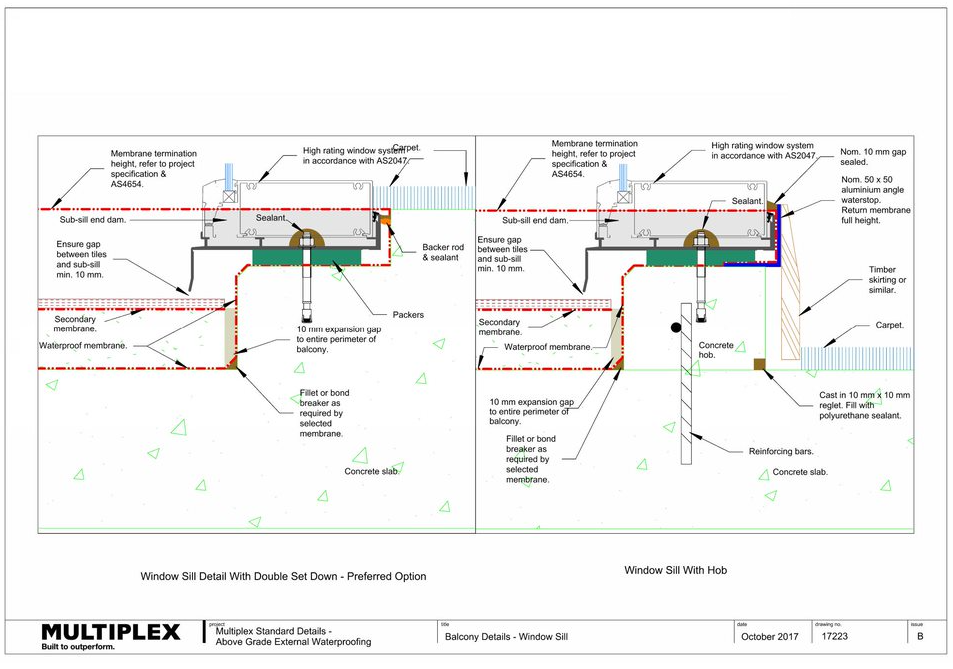
Balcony Tiles
A 10mm air gap must be maintained from the tile to the sub-sill.

Tile Adhesive
What are the different types of tile adhesives?
Tile adhesives have the following chemical compositions:
- Cementitious (C), adhesives made from a mixture of hydraulic binders, aggregates and chemical additives. They may be either a one-component type, which means they need to be blended with water and/or latex
- Dispersion (D), a mixture of organic binders dispersed in water polymers with organic additives
- Reactive (R), a mixture of synthetic resins which harden through a chemical reaction (components A and B)
- Tile adhesives are made up of the following classes:
- Class 1: Normal adhesives
- Class 2: Improved adhesives
- Class F: Fast-setting adhesives
- Class T: Reduced slip adhesives
- Class E: Adhesives with extended open time
- Class S1: Deformable adhesives (for cementitious adhesives only)
- Class S2: Highly deformable adhesives (for cementitious adhesives only)
Adhesives must:
- Be cured for a minimum of 12 hours or as specified by the manufacturer before grouting.
Sealants
Sealants must be:
- On a backer rod (20% bigger than joint)
- Compatible with the stone and other components
- Correct ratio – width to depth
- UV tolerant, (outdoors)
- Tooled into the joint, ideally to an hourglass shape
- Installed as per MPX standard details. Refer Drg 3001, 3002, 3003, 3004, 3006, 3007
Completion
- Run shower for ten minutes to ensure falls are correct and pipes are clear.
- Ensure temporary protection is in place prior to handover and does not abrade the tile.
- No undue ponding in finished floors in wet areas and external tiles areas.
Multiplex Standard Details
3002 - Detail A From 3001 - Typical Intermediate Joint
3003 - Detail B From 3001 - Handrail Post and Perimeter Joint
3004 - Sections 1 & 2 From 3003
3008 - Section 1 From 3001 - Joint Over Supporting Structural Element
Document Control
Version 2, December 2020 - Inclusion of requirements relating to slip resistance, testing, control joints in internal walls and intermediate expansion joints.